


Like pillowcases, duvet covers keep your favorite bedding clean — protecting your luxury comforters and duvets from dirt, dust, sweat, and stains.
They’re also an easy way to add a touch of designer style to your bedroom. Want to change the look of your room completely? Simply put on a duvet cover for a fresh aesthetic.
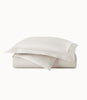
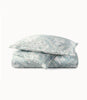
Lyric Percale Duvet Cover
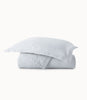
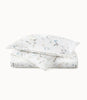
Juliet Matelassé Coverlet
Putting on a Duvet Cover — An Easy Hack
Though duvet covers are easy to clean and quickly add a statement piece to your bedroom, many people find them extremely difficult to put on, especially when doing it alone. Secured with ties, buttons, or zippers, the opening of the duvet cover is usually at the bottom ends, which makes it challenging to fill.
But there are some stress-free ways to put on a duvet cover without it being a huge ordeal. One simple hack? Flip the duvet cover inside out beforehand. Not doing this is one common mistake many people make that adds more time and struggle when putting on a duvet cover.
There are also some tried and true methods that follow a set of specific steps. For example, here are two simple and stress-free ways to put on a duvet cover and get it to stay in place.

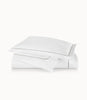
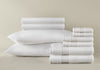
Boutique Percale Duvet Cover
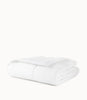
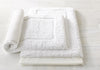
Down Alternative Duvet
How to Put on a Duvet Cover: The California Roll Method
Also known as the burrito roll method, this technique is popular because of how simple it is to navigate. If you can roll bedding, you can master putting on a duvet cover this way.
Inspired by how sushi is made (or rolled), the California Roll follows five simple steps.
Step 1: Flip your duvet cover inside out. Place it on your bed with the opening of the duvet cover at the foot of the bed.
Step 2: Lay your bedding on top of the duvet cover. Align the corners and edges to match neatly (nothing’s worse than lumpy bedding).
Step 3: Roll the bedding and duvet cover. Once the bedding and the duvet cover are aligned, it’s time to roll them together. Start at the edge opposite the duvet cover opening and start tightly rolling. Make adjustments as you go to ensure everything stays together, just like a sushi roll or burrito.
Step 4: Stuff the rest of the bedding inside the duvet cover. After everything is rolled together, take the remaining bedding and tuck it inside the duvet cover at the corners — turning it inside out. Zip, button, or tie the opening to secure the bedding.
Step 5: Unroll, smooth, and fluff. Unroll the bedding carefully and smooth out any wrinkles as you go, ensuring the bedding inside has evenly filled the duvet cover. Give it one last fluff, and that’s it. You’re done!


700 Fill Canadian White Down Duvet

European Washed Linen Duvet Cover
How to Put on a Duvet Cover: The Traditional Method
While the California Roll is touted as one of the easiest ways to put on a duvet cover, there is another straightforward way to do it. This traditional technique requires a simple stuffing method that can be completed in four easy steps.
Step 1: Put the bedding flat on top of your bed.
Step 2: Lay the duvet cover (inside out) on top of the bedding. Turn your duvet cover inside out and put it on top of your bedding. The opening of the duvet cover should be at the foot of the bed, and the corners should align with your bedding.
Step 3: Flip the duvet cover and bedding right side out. Place your hands inside the duvet cover at the foot of the bed. Grab the top two corners of both the bedding and the duvet cover. Then flip the duvet cover right side out so it falls over the bedding. You might need to give it a shake or two to help the duvet cover fall over the bedding completely.
Step 4: Stuff, fluff, and close the opening. Stuff any remaining bedding inside the duvet cover. Then zip, tie, or button the opening closed. Give it one last shake or fluff so everything lays flat without any wrinkles.
How to Put on a Duvet Cover: In Conclusion
Sleep is important. And nothing’s worse than trying to rest under a lumpy pile of bedding. But with a bit of practice, putting on a duvet cover can become a quick and easy task. That way, you can save time and rest easy, knowing that swapping out your bedding will be a breeze.